
You love your house, but it no longer fits the way you live. The kitchen feels crowded by 7 pm. One bathroom isn't enough in the morning. A spare room that once worked now has to be a study, guest room and storage cupboard all at once. That's usually the point where Melbourne homeowners start planning a house extension.
The tricky part isn't wanting more space. It's working out whether the idea on paper will suit the block, survive council scrutiny, and stay within budget once permits, structure, drainage and finishes all hit at once.
A good extension doesn't start with drawings. It starts with clear decisions. What space do you need? What can the site support? What will you spend on the shell, and what still needs to be left for waterproofing, cabinetry, lighting and the parts you touch every day?
On Melbourne sites, those early decisions matter more than people expect. Soil movement, side access, heritage controls, wet area rules and neighbour impacts can all change the shape of the project. If your addition includes a bathroom or laundry, it also pays to understand how structure and moisture control work together. A practical primer like this guide to lasting house foundations for homeowners helps explain why the work under the floor often drives what's possible above it.
Your Guide to a Successful Home Extension
Most first extensions begin with a familiar conversation. You're sitting at the kitchen table, looking around a house you still like, and wondering whether moving is really worth the cost and disruption. For many Melbourne families, the answer is no. They'd rather stay in the suburb they know, keep the school run manageable, and make the house work harder.
That can mean a rear addition for a bigger kitchen and meals area. It can mean turning dead yard space into a new bedroom and ensuite. Sometimes it's not a large build at all. A modest extension that gives you a better laundry, a proper second bathroom and more storage can completely change how the house functions.
The process feels bigger than it is when you look at it all at once. Council rules, consultants, engineering, permits, contracts, selections, trades. Read as a single list, it's enough to make people freeze. In practice, the job gets easier when each decision happens in the right order.
A smooth extension usually comes from boring early work done well. Measure properly, check the site, price honestly, and resolve the layout before demolition starts.
That's the approach worth taking. Be optimistic about the outcome, but disciplined about the planning. Melbourne projects reward homeowners who sort feasibility before design, approvals before build, and drainage and waterproofing before finishes.
Assess Feasibility and Set a Realistic Budget
The first reality check is simple. Can your property physically and legally take the extension you want, and can you afford to build it properly?
A lot of stress comes from mixing those two questions together. Homeowners often jump straight to plans and finishes, then discover the budget doesn't match the site conditions or permit path. It's better to test both up front.
Start with the budget range
For Melbourne extensions, the broad cost benchmark is already enough to tell you whether your idea is modest, stretched or unrealistic. Average builds cost AUD 2,800 to 4,200 per square metre in 2025, and a standard 30sqm single-storey extension sits around AUD 90,000 to 120,000 according to Melbourne extension cost guidance. The same source notes that a detailed quantity surveyor report costs around AUD 1,500, and 62% of projects without one exceed budget.
That doesn't mean every project lands neatly inside that range. Site access, wet areas, excavation, engineering and material choices can push the figure around. It does mean you should treat lowball assumptions with caution.
If you want a bathroom or laundry in the extension, expect the wet area work to load more cost into the same floor area than a simple bedroom or living zone would. Plumbing, waterproofing, drainage falls, extra certification and tile labour all add complexity.
Build the budget in layers
A workable budget needs more than a single build figure. It should separate the main construction cost from the supporting costs that usually get forgotten early.
Here's a practical starting template.
| Expense Item | Estimated Cost Low End | Estimated Cost High End |
|---|---|---|
| Main build cost for 30sqm extension | AUD 90,000 | AUD 120,000 |
| Basic planning application fee | AUD 1,400 | AUD 1,400 |
| Quantity surveyor report | AUD 1,500 | AUD 1,500 |
| Soil tests | AUD 1,000 | AUD 2,000 |
| Engineering and waterproofing certifications | AUD 5,000 | AUD 15,000 |
That table isn't your full contract sum. It's a planning framework. You still need to account for contingency, upgraded materials, consultant input and any permit or planning costs that apply to your specific design.
For homeowners trying to get their heads around early affordability, this resource on managing your home design budget is useful because it pushes you to separate must-haves from nice-to-haves before drawings become emotionally expensive.
You can also use a renovation calculator as a rough first pass, such as this page on estimate renovation costs. It won't replace a proper scope and quote, but it helps anchor expectations before you appoint consultants.
Practical rule: If the project only works when everything goes perfectly, the budget is too tight.
Check whether the site supports the idea
Numbers alone don't tell you if the build is viable. Walk the site and look at it like a builder.
Check these early:
- Access to the rear: Narrow side paths, steep grades and established landscaping can make labour slower and materials harder to move.
- Easements and services: Drainage lines and other restrictions can affect where footings or walls can go.
- Orientation: Northern light is valuable in Melbourne. A bigger room that ends up dark and cold can feel like a poor trade.
- Neighbour relationship: Windows, setbacks and overshadowing can all become planning issues.
- Connection to the existing home: The best extension feels integrated, not like an add-on stitched to the back wall.
Wet area additions need another layer of thinking. Bathrooms and laundries are easiest to build when waste lines, venting and water supply can be routed sensibly. The shortest plumbing run isn't always the best solution, but awkward layouts usually cost more to execute and maintain.
Treat contingency as part of the project
On paper, contingency looks optional. On site, it never is. Melbourne homes regularly hide issues once demolition starts. Old drains, previous DIY work, uneven framing, water damage and movement in reactive soils all show up at the wrong moment.
The safest mindset is to preserve money for unknowns rather than spend every dollar on visible finishes before the job begins. A smart extension budget protects the structure first, then the wet areas, then the finish level.
That order matters. Nobody enjoys downgrading tapware or tiles after getting attached to a look, but it's still a better outcome than stripping cost out of drainage, waterproofing or engineering.
Create Your Extension Design and Layout
The design stage is where the extension either becomes more practical than the house you started with, or more expensive than it needs to be. Good design isn't about adding floor area alone. It's about making the old and new parts of the home work as one.
Decide who needs to be on the team
Not every project needs the same design team. Some homeowners need an architect because the site is constrained, the brief is complex, or the house sits in a sensitive streetscape. Others can work well with an experienced building designer and engineer.
What matters is that whoever draws the extension understands how Melbourne homes are built and approved. A clever floor plan that ignores drainage, structure or permit constraints can cost more to fix later than it did to design.
Even outside Australia, survey-led planning advice tends to make the same point. This article on planning a London extension using surveys is useful because the principle carries over well. Site information should shape the design, not arrive after it.
Design the flow before the look
Most homeowners first talk about style. Tiles, windows, joinery colour, benchtops. Those things matter, but the layout comes first.
Ask harder questions while the design is still flexible:
- Where do people drop bags, shoes and laundry now?
- Will the extension improve circulation or create bottlenecks?
- Does the new room borrow light or block it from existing spaces?
- Can furniture fit the way the plan suggests?
- Will doors, vanities and shower screens clear each other properly in a wet area?
A strong extension often solves several daily problems at once. A rear addition might create a larger kitchen, but it should also improve storage, sightlines to the yard and the path from entry to living spaces. A bathroom extension should do more than squeeze in another shower. It should make privacy, cleaning and ventilation easier.
Resolve the awkward corners on paper. They become expensive once walls are framed and pipes are in.
Plan wet areas with more discipline
Bathroom and laundry extensions get underestimated because they don't always look structurally dramatic. They are still some of the most technical rooms in the house.
For Melbourne projects, AS 3740 waterproofing compliance and NCC 2022 7-star energy rating requirements are mandatory, and those requirements can add 5 to 10% to project cost according to the bathroom extension planning note in the Melbourne wet area guidance. The same source notes that 42% of Melbourne extension projects encounter unexpected reactive clays, which is why early building surveyor input matters.
That combination matters in practice. If the slab, subfloor or footing design isn't right, wet area performance suffers. If waterproofing and ventilation are treated as afterthoughts, bathrooms can look finished while still being vulnerable.
Three things usually work best:
Keep plumbing runs logical
Group fixtures sensibly where possible. Long, awkward pipe routes create more penetrations and more points to coordinate.Design for drying
Wet areas need reliable extraction, manageable splash zones and surfaces that don't trap moisture.Review levels early
Shower falls, floor finishes and door thresholds need to be coordinated before the frame is locked in.
Review the plans like a builder would
Before you sign off, print the plan and mark it up. Don't just admire it.
Check where the hot water service sits in relation to the new bathroom. Check where towels will hang. Check whether windows will face a fence or capture light. Check whether the laundry basket has a home. Extensions succeed when ordinary daily use has been thought through in ordinary detail.
A tidy drawing set should answer practical questions, not create them.
Navigate Melbourne Council Permits and Approvals
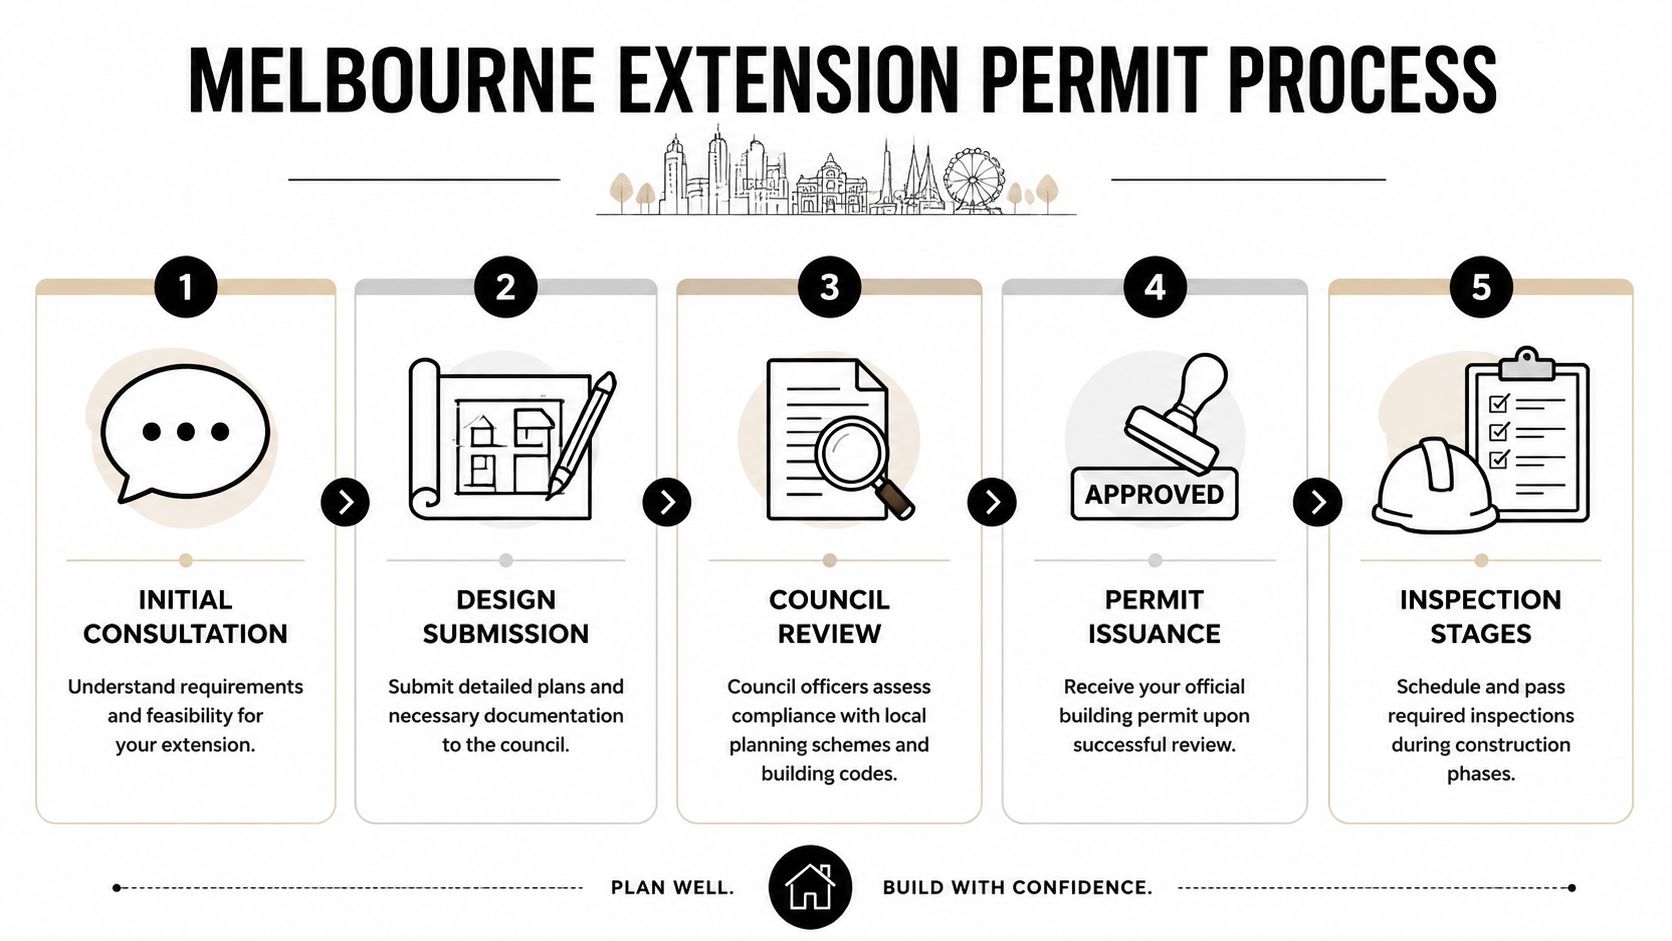
Council approval worries most homeowners because the language feels unfamiliar. Planning permit. Building permit. ResCode. Overlays. Setbacks. Overshadowing. The easiest way to stay calm is to separate the process into two parts.
A planning permit deals with whether the proposal is allowed under the planning scheme. A building permit deals with whether the approved design can be built safely and in compliance with building regulations. Many projects need both. Some only need the building permit.
Know where the common delays come from
In Melbourne, permit issues often come down to controls that homeowners don't notice until plans are already underway. Height, setbacks, neighbourhood character, overlooking and heritage triggers are common examples.
According to Melbourne extension permit guidance, 68% of extension proposals require a discretionary planning permit due to issues such as single-storey height limits of 3.6m or setback requirements. The same source says average approval times are 2 to 4 months, basic applications cost around AUD 1,400, and a free pre-application meeting with local council can reduce rejection rates by 40%.
That free meeting is one of the best early moves you can make. It won't design the job for you, but it can tell you where council is likely to focus.
What to prepare before lodging
A stronger application usually includes more than floor plans. Councils and surveyors want to understand the whole impact of the extension.
Prepare for documents such as:
- Site and existing conditions information: Boundary dimensions, existing structures and site constraints.
- Proposed plans and elevations: The drawings need to show the relationship between old and new clearly.
- Neighbour impact material: Overshadowing and overlooking are common flashpoints.
- Structural and site information: Soil, footing and drainage considerations often affect the buildability of the design.
If you're extending an older property, age alone doesn't stop the project, but it often means hidden conditions are more likely. That's especially true where there have been piecemeal alterations over the years. Homeowners dealing with period homes or previous ad hoc work often find this guide on renovating older homes useful because older fabric tends to complicate even straightforward additions.
Council delays often begin with incomplete information, not hostile intent. Give assessors a clear, coordinated application and the process usually runs better.
Understand the practical sequence
The order matters. A common mistake is trying to rush toward construction pricing before the permit path is clear enough. That creates false certainty.
A practical approval sequence usually looks like this:
- Test the proposal with council or a town planner early
- Refine the design around likely planning issues
- Lodge a complete planning application if required
- Respond to requests for further information quickly
- Move to building permit documentation once the planning path is settled
The projects that bog down are often the ones that try to solve neighbourhood character, neighbour impact and structural detail all at the same late stage. Separate those tasks, and the process becomes much more manageable.
Choose Your Builder and Finalise Timelines
A strong set of drawings can still produce a rough build if the wrong builder gets the job. Homeowners often lose time and money here because they compare quotes by headline figure instead of by scope, experience and communication.
Price matters, but it isn't the first filter. For planning a house extension well, the better question is whether the builder understands extensions to occupied homes, tie-ins to existing structures, and the extra coordination that comes with bathrooms, laundries and staged living arrangements.

What to ask before you compare quotes
When you meet builders, look for evidence that they think in sequence and detail. A good extension builder will ask about access, staging, site protection, service connections and selections. They won't just glance at the plans and throw out a casual number.
Use conversations and written quotes to test these points:
- Registration and insurance: Check VBA details and make sure the paperwork matches the business tendering the job.
- Relevant project experience: New homes and extensions are not the same type of work.
- Inclusions and exclusions: A cheap quote often leaves out demolition detail, drainage work, or fit-off items.
- Site management approach: Ask who will run the job day to day.
- Variation process: You need to know how changes are priced and approved before work starts.
The cheapest quote can become the most expensive build if the scope is vague.
Payment structure matters
A clear payment schedule protects both sides. It should follow real milestones rather than arbitrary dates. You want enough detail to understand what has been completed before each claim is due.
One practical benchmark from extension guidance is a staged structure of 25% deposit, 30% at frame, 25% at lock-up and 20% at fit-out in the extension construction advice. That same source notes that a staged schedule can reduce variations when the scope is locked in properly.
You still need to read the actual contract carefully. Payment timing only works if the drawings, specifications and selections are clear enough to support it.
Be realistic about the build timeline
Most homeowners ask how long the extension will take, but the more useful question is how many moving parts need to line up before the finish date can be trusted.
A standard extension timeline usually includes:
- Pre-start coordination such as final selections, engineering and permit sign-off
- Site preparation and demolition
- Footings, slab or subfloor work
- Framing and roof structure
- Lock-up, including windows, doors and external cladding
- Rough-in trades, especially electrical and plumbing
- Waterproofing, linings and tiling in wet areas
- Fit-off and defects
Bathroom-heavy projects often feel slower in the middle than homeowners expect because waterproofing, drying time, tiling and fit-off require trades to work in tighter sequence than a plain room extension does.
A lot of clients find it useful to compare extension sequencing against a more focused wet area timeline like this guide on how long does a bathroom renovation take. The jobs aren't identical, but the lesson is the same. Wet area work rewards patience and coordination.
Here's a short explainer that helps homeowners understand what a managed build process should feel like in practice:
A builder who gives you a neat finish date without talking through staging, selections and access is usually telling you what you want to hear. A builder who explains dependencies clearly is more likely to deliver a job that stays organised.
Manage the Build and Add Finishing Touches
Once the build starts, your role changes. You're no longer choosing whether to proceed. You're helping the project keep its shape.
That doesn't mean micromanaging trades. It means keeping decisions timely, communication clear and variations under control. Most difficult builds don't unravel because of one dramatic failure. They drift through small delays, rushed choices and unresolved details.
Stay close to the job without getting in the way
Set a regular meeting rhythm with your builder. Weekly is often enough for a standard residential extension. Keep a running list of questions and decisions so site meetings stay focused.
Use that time to confirm:
- What finished this week
- What starts next
- What decisions are needed from you
- Whether any variation is likely
- Which materials need ordering now
If something changes, insist on written confirmation. Verbal agreements are where many budget disputes begin.
Decide early whether you'll live in the house
Some families stay through the build and cope well. Others find dust, noise, temporary services and loss of privacy harder than expected.
The answer usually depends on where the work sits. A rear extension with a liveable front portion may be manageable. A job that cuts through the main bathroom, kitchen and daily access routes is much tougher. If you stay, set up a temporary zone that can carry the household for the rough period. That might mean a small fridge, microwave, kettle and a clear path that children can use safely.
Save money in the right places
Late-stage savings should never come from hidden technical work. Don't cut corners on waterproofing, drainage, ventilation, substrate preparation or structural items.
You can often save money more safely by:
- Choosing simpler tile formats that are faster to lay
- Avoiding unnecessary custom joinery where standard sizes work
- Sourcing fixtures early so rushed substitutions don't inflate cost
- Leaving some decorating tasks for after handover if you're confident doing them well
The best finishing decisions usually balance durability and ease of maintenance. That matters more in bathrooms and laundries than in any brochure shot. A surface that looks sharp for one month but shows every mark, traps moisture or makes cleaning difficult won't feel like money well spent.
A well-managed extension should feel settled by the end, not patched together. That comes from hundreds of small decisions made in order, with the practical side protected all the way through.
If your extension plans include a bathroom, ensuite or laundry, Western Bathroom Renovations can help you get the wet area side right from the start. Their Melbourne team handles design, layout planning, waterproofing, tiling and fit-off with a strong focus on practical budgets, durable finishes and compliant workmanship.
